 button to continue. button to proceed. SiteSurfer
should now prompt you for the address of the site you wish to index.
button to continue. button to proceed. SiteSurfer
should now prompt you for the address of the site you wish to index.

For the purposes of this example, we have entered www.devtech.com. When
a partial address with no protocol or path specification is used, SiteSurfer
assumes that the protocol is "http" and the path is "/". Thus SiteSurfer will
resolve this address to http://www.devtech.com/. Press the
button to continue.
You should now see four radio buttons: Direct, Proxy, Local mirror, and Local server. Each one of these options represents a method of retrieving data and building the index. Detailed descriptions of each build method are available.
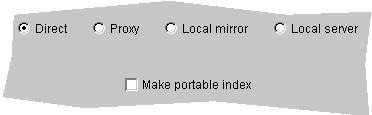
Here we have chosen to index the site directly, which means SiteSurfer will go
out onto the Internet and retrieve pages directly from the address we just
entered a minute ago. Press the
button to continue.
Next you are presented with a few choices for what kind of features to integrate with the SiteSurfer applet.
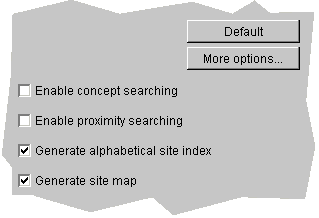
The  button will
display a special dialog for configuring many advanced
features of SiteSurfer. For now, will we stick with the defaults, which means
the SiteSurfer applet will not only support searching, but will have a sortable
site index and a site map that presents a tree view of the site.
button will
display a special dialog for configuring many advanced
features of SiteSurfer. For now, will we stick with the defaults, which means
the SiteSurfer applet will not only support searching, but will have a sortable
site index and a site map that presents a tree view of the site.
After pressing the
button, SiteSurfer will present you with two options for how to crawl the site.

You may choose to index the entire site or first select which pages you want
in the index. Here the latter options has been selected. This means that after
the button is pressed,
SiteSurfer will crawl the site and then present you with a list of all the pages
it has found.
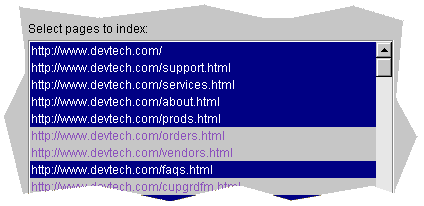
Each page may be individually selected or deselected, to include or exclude
it from the final index. Once you have chosen which pages you want included,
press the button to
proceed to the next step.
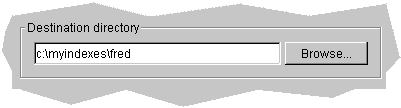
The final panel requiring user input lets you choose where to place the index files, the applet, and the sample HTML pages for the applet. You may enter any directory in the filesystem. SiteSurfer will ask you whether to create a directory if it does not exist yet.
Finally, press the  button to let SiteSurfer complete indexing process and generate files in the
chosen directory.
button to let SiteSurfer complete indexing process and generate files in the
chosen directory.
After SiteSurfer has completed all steps and saved the generated files, it will display a panel showing where the files have been stored, as well as if any problems were encountered--such as bad links in HTML files--and a short summary of what fields were indexed, such as titles or keywords.
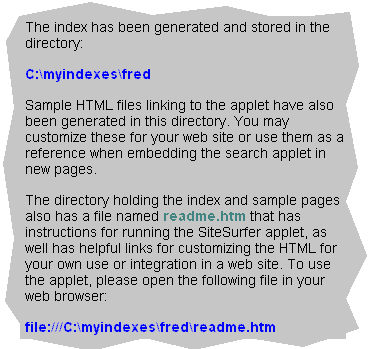
From here you may  the program or press the
  button for more information about how this site was processed, including
all the pages, error descriptions, and more helpful statistics. All done!
button for more information about how this site was processed, including
all the pages, error descriptions, and more helpful statistics. All done!